Dew Devlog
eyeLidAttach
A custom node that drives eyelid deformation.
eyeLidAttach
We’re all familiar with the eyelid attach method that most people use. It’s either a ribbon, or a series of aim constraints all pivoted on the center of an eyeball, that rotate along a curve or some sort of driving deformer.
This can all be scripted to be set up pretty quickly, and that’s worked just fine for me for a number of years. The issue that I take with it is that it’s expensive. There are a lot of constraints, and when you have multiple characters in the scene, along with all the other face components, it can start to tack on and become very cumbersome.
It could bottleneck, and to be frank, the way that it shears when it rotates can often have parts sliding past each other in an unpleasant way. It doesn’t really feel like it’s sliding over the eye surface.
So I figured now was as good a time as any to correct a lot of these issues.
Basic Idea
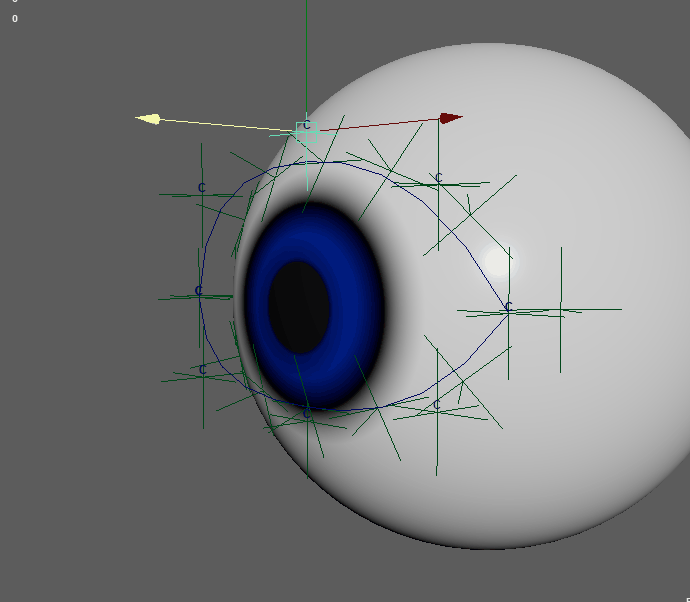
The basic idea is pretty simple: sample a point from the lid curve, read the local tangent from that same parameter, and then project the sampled position back onto the eye surface. That gives me a clean surface-following point while still preserving the useful directional information from the original curve.
bool sampleProjectedPointAndTangentAtFraction(
    MFnNurbsCurve& fnCurve,
    double fraction,
    const MMatrix& eyeMatrix,
    const MMatrix& eyeInverse,
    double radius,
    MPoint& outProjectedPoint,
    MVector& outTangent)
{
    MPoint curvePoint;

    if (!getCurveWorldPointAtParamFraction(fnCurve, fraction, curvePoint))
        return false;

    if (!getCurveWorldTangentAtParamFraction(fnCurve, fraction, outTangent))
        return false;

    if (!projectPointToSpherePlanar(
        curvePoint,
        eyeMatrix,
        eyeInverse,
        radius,
        outProjectedPoint))
    {
        return false;
    }

    return true;
}
Curve Profiler
A lot of this is not possible without another component I wrote a couple months prior to this called the Curve Profiler. It's a custom node that profiles and shapes a closed loop, and this is the main driver to move around the projected points on the eyelid surface. It's what gives it its nice shape.
Just keep in mind that this isn’t an isolated system. Everything here is procedural. I’ve written a lot of custom nodes, and the larger goal is for all of them to work together as part of a layered rigging system.
With that said, I’ll go over those other components in a separate post down the line. For now, just know that this node isn’t meant to operate completely by itself, it’s one piece of a much larger setup.
For this node to function, it needs a few key pieces of information: the upper and lower eyelid curves, the eye’s rest matrix, the current eye matrix, an up-reference, the eye radius, and the inner/outer corner transforms. From there, the node can sample points along the lid curves, project them back onto the eye surface, and build stable output matrices for the upper lid, lower lid, and corners.
Deformation Test
To wrap this up, here is a deformation test skinned to an actual eye model and eyelid geometry. You can see that the shapes are clean, the system drives pretty well, and there are minimal positions that need to be moved manually.
Again, I want to reiterate that this isn’t an isolated system. There are quite a few other components I built for this setup, many of which are also custom nodes. Some of them are there for quality-of-life improvements in the rig. For example, I have a three-point arc driver that helps maintain clean spacing between sub-controls. I’ll go over that in another post when it becomes more relevant.
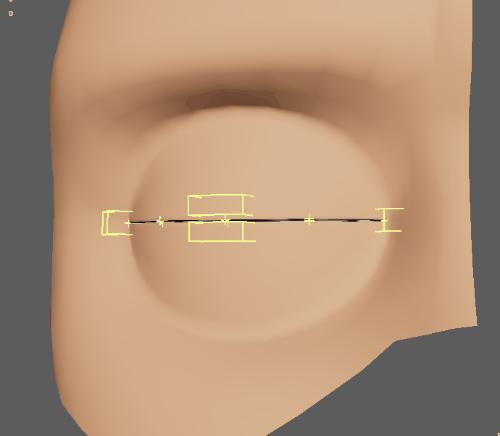
For now, this post is focused specifically on what is being driven on the eyeball itself. As you can see, the node also has a fleshy-eye behavior built into it, which allows the eyelid to react more naturally with the movement of the eye.